Simple vs Multi-keyframe
Multi-keyframe easing curves in Kease give you advanced control over easing, allowing you to shape and refine animations far beyond standard keyframe interpolation.
Simple Easing Curves
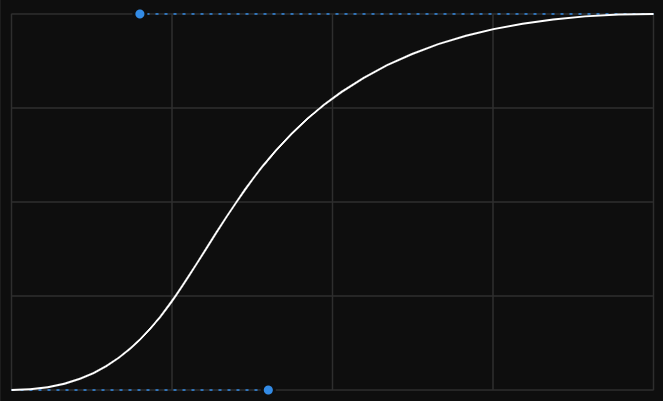
Easing curves are a foundational tool for any motion designer, and in Kease they are called Simple. They consist of two Bézier handles and affect the motion between two keyframes.
If you are aiming for more complex motion, you often end up combining multiple easing curves.
Multi-keyframe Easing Curves
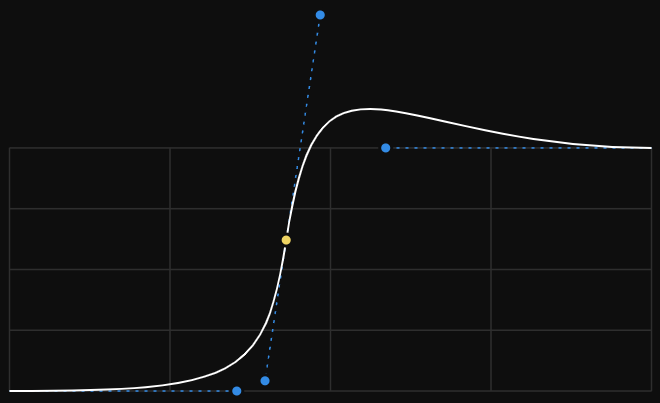
Multi-keyframe curves, on the other hand, allow you to create a curve far more complex than a standard two-handle Bézier. Think of it as crafting a continuous, flowing motion over several keyframes and treating it as a single curve that can be applied elsewhere or saved as a preset.
Preset Library
A place for all your favorite easing curves, organized into groups, customizable in size and color, and optionally labeled by name or influence values.
The Library contains both Simple and Multi-keyframe Presets.

Intuitive UI
Organizing your preset library is straightforward, with drag-and-drop functionality that allows you to move individual presets or preset groups wherever you need them.
Plenty of options
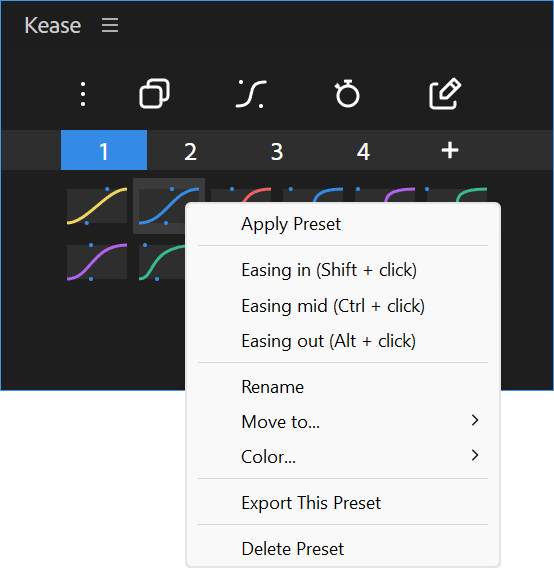
Right-click on a preset to open a feature-rich context menu and get a helpful reminder of all available shortcuts.
Simple Presets
They provide a one-click solution to adjust keyframe interpolation, controlling how an animation speeds up and slows down, making movements look smoother and more expressive.
Multi-keyframe Presets
Easing curves on steroids
This unique and mind-blowing feature overcomes the limitations of standard easing curves. It automatically generates additional in-between keyframes, making it easy to create complex motions like overshoot, anticipation, bounce, and more.
Graph Editor
Kease Graph Editor brings a faster, more intuitive way to fine-tune your animation curves in After Effects. Built for speed and creativity, it lets you visualize, edit, save and apply Easing Curves effortlessly, both Simple and Multi-keyframe.
Mirror handles
Move one handle of a Simple Preset’s Bezier curve and automatically mirror the opposite handle.
Windows: Ctrl + Alt + drag
macOS: Alt + Meta + drag
Intuitive Curve Control
Add and remove points
Win: Ctrl + click
Mac: Opt + click
Pull out the handles
Win: Alt+ click
Mac: Cmd + click
Independent move
Win: Alt + drag
Mac: Cmd + drag
Constrains
Win: Shift + drag
Mac: Shift + drag
Reset to default
Double click on an empty area
Copy & Paste Easing Curves
Easily transfer easing curves from one animation to another.
Simple Copy & Paste
Copying and pasting an easing curve applies each keyframe’s easing to its matching keyframe in order. This one-to-one relationship is the default behavior and the one you are probably used to.
The power of the Graph Editor
Break the limit of copying and pasting Simple Easing Curves. With the Graph Editor, you can now copy and paste easing curves that span over multiple keyframes, preserving the continuous motion, relative in-between keyframes and handles.
When pasted, Kease intelligently rebuilds this Multi-keyframe Easing Curve across your selected keyframes, recreating the necessary in-between keyframes and handles, even when timing or spacing is different.
Copy & Paste Values
Copy the values of one or more keyframes to another set of keyframes without changing their time interpolation
Precise control with Modifier Keys
Holding a Modifier Key while applying an easing curve helps you target a specific portion of your keyframe selection.
Windows
- Shift: targets the incoming section.
- Ctrl : targets the middle section.
- Alt: targets the outgoing section.
macOS
- Cmd: targets the outgoing section.
- Shift: targets the incoming section.
- Opt : targets the middle section.
It works everywhere
- when copying and pasting an Easing Curve
- when applying a Preset
- when applying a curve using the Graph Editor